
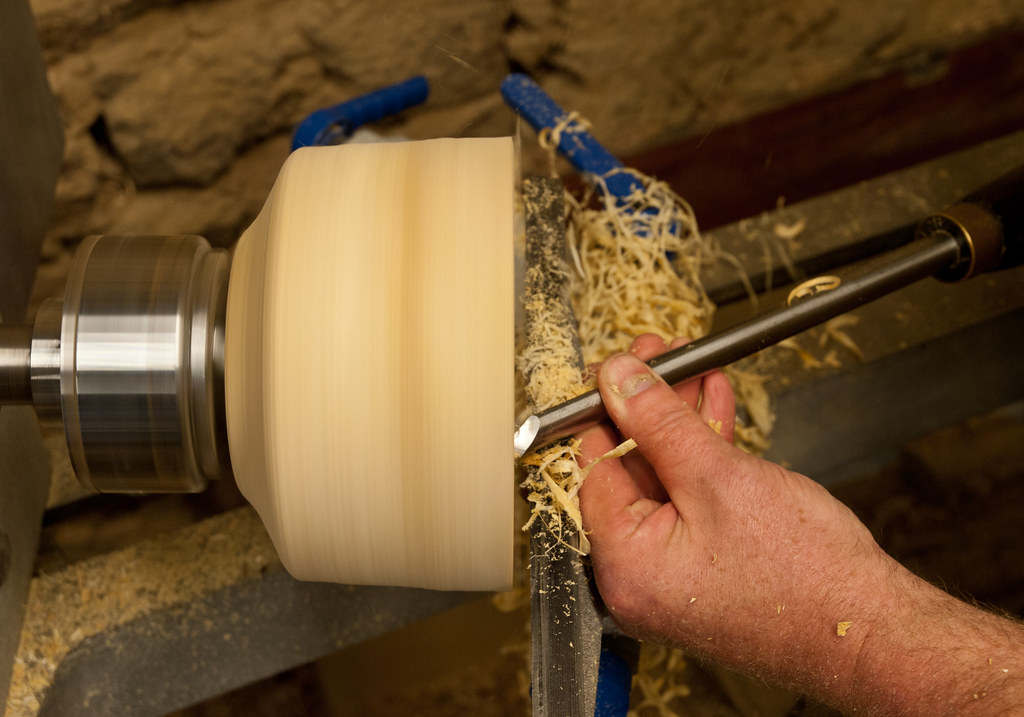
For beginners, it might seem difficult to know how to add texture and dimension to your woodturning project. Ernie Conover shows how easy it is to add texture to woodturning projects. Textures are natural patterns that adorn objects in different ways. These textures can be used to enhance your project's personality and design. Whether you're making a salt and pepper shaker, a bottle stopper, or a stacked ring bowl, there are many ways to add texture to your project.
Make a rolling-pin
If you've recently taken up woodturning, you might have wondered how to make a rolling pin. Wood rolling pins are generally long and made of wood that is free of defects throughout. You can use any hardwood for the pin depending on its length. But hard maple, cherry wood, apple wood, and ash are all good choices. While some cheaper versions can be made from soft maple or birch, it is important to choose the right wood for your task.
To begin, measure the diameter of the handle and the diameter of the rolling pin. To measure the handle diameter, you can use the Parting Instrument. After measuring the handle diameter, the Roughing Gouge will be used to reduce the handle length until it reaches its desired diameter. After measuring the diameter of the pin, use the Bowl Gouge in order to make its curves. This will allow to you to thread the pin. After the rolling pin has been prepared, you can apply a food-safe coating and allow it to dry for 15 minutes.
Making a salt-and-pepper shaker
There are many options for making these useful utensils, whether you're looking to give a gift that's unique or to keep in your home. You can make a stunning salt-and pepper shaker by using a mason jar. With a small nail, hammer and a pencil, make small holes around the letters. A cork can be placed through the holes, leaving 5/8-inch wood at the end. Fill the shaker with salt and pepper and enjoy your creation.
You might have a collection of Coca-Cola bottles lying around your home that aren't being used, and you can use these bottles to make a salt-and-pepper shakeer. To add some detail, you can use tape to remove the lines from the bottle. You can also use any colour of all-surface paint.
Making a bottle cap
You need to follow a few steps in order to make a bottle stopper. First, you must mount the blank between two centers. This produces a collet for mounting in the chuck. You will then turn the piece to create the desired shape. You will then turn a threaded rod to attach the decorative, turned part of the bottle. You can use different sizes threaded supports.
It is essential to select the right wood type for your project before you begin. You can buy blanks from a craft store. Although the blanks are already squared, if the blanks are cut by you, make sure they are perfectly square. If you purchase the wood in a store you will need to square them. If you don't have a chop saw, or tablesaw, you can use it instead. You can clamp an odd-shaped piece to make it square. Finally, sand the stopper with a fine-grit sandpaper to make the finish smooth and even.
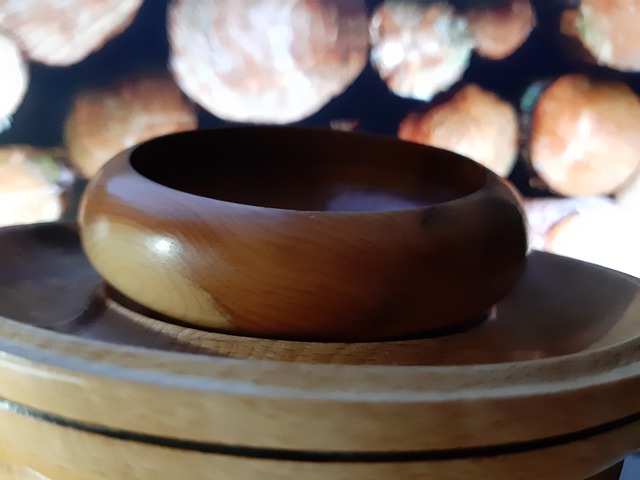
How to make a stacked bowl ring.
A stacked ring bowl is a bowl that you create for woodworking by cutting multiple flat boards into concentric rings. Normally, the rings are glued together with a butt joint, but a sliding dovetail joint can add interest. The boards should be approximately five inches wide and one inch thick. Each board's faces have been joined and the join edge has been planed.
You can cut a segmented ring bowl using a jig or trammel. The board thickness will determine how many layers are needed to reach the desired height. The thickness of the board should not be less than 1 inch. You can also use a trammel, or a circle-drawing device to mark the bandsaw lines.
FAQ
How much should a hobbyist invest to get started?
It is likely that you will need some capital in order to buy the required tools and supplies if your goal is to open your own woodworking business. It's a good idea to buy a small tablesaw, drill press and circular saw. These items are affordable so you won’t break the bank.
What woods are suitable for making furniture?
Woods are classified based on their hardness. Softwoods are pine, cedar and cypress. Because they are resistant to rot, softwoods are often used as outdoor furniture. These hardwoods include maple, mahogany and teak. They are generally indoors as they don't weather well outside.
Is it easy to start a woodworking business?
It can be difficult to start your woodworking business. There are lots of legal requirements and regulations that you'll need to follow. This doesn't necessarily mean that you should go through all the work of setting up a company. Many people join already-established businesses. You only need to pay membership and tax fees.
Do you know anything more about woodworking?
It is easy to underestimate the amount work involved with furniture construction. Finding the right wood for the project is the hardest part. There are so many wood options that it can be difficult to choose the right one.
Another problem is the fact that not all wood has the same properties. Some woods will crack or warp with time. Others will split or crack. These are important considerations to make before you purchase wood.
Are you able to teach yourself woodworking
Doing is the best way to learn any subject. Woodworking is an art form that requires patience, practice, skill, and experience. Any craft requires patience to master.
To actually learn something is the best way. So start small and build on what you have learned from there.
How do I identify the type of wood that I am dealing with?
When purchasing wood, always check the label. It should have information about the wood species as well its moisture content and whether any preservatives were used.
Statistics
- If your lumber isn't as dry as you would like when you purchase it (over 22% in Glen Huey's opinion…probably over 10-15% in my opinion), then it's a good idea to let it acclimate to your workshop for a couple of weeks. (woodandshop.com)
- In 2014, there were just over 237,000 jobs for all woodworkers, with other wood product manufacturing employing 23 percent; wood kitchen cabinets and countertop manufacturing employing 21 percent. (theartcareerproject.com)
- The best-paid 10 percent make $76,000, while the lowest-paid 10 percent make $34,000. (zippia.com)
- Average lumber prices rose about 600 percent between April 2020 and May 2021. (familyhandyman.com)
External Links
How To
How to stain wooden surfaces
The process of staining wood involves the application of chemicals to the wood's surface, which causes it to change its color. This chemical reaction causes the wood color to change from white and brownish red. Oak is the most commonly used wood for staining, but other woods can also be stained.
There are many options for applying stains to wood surfaces. Some methods include mixing the stain along with a solvent like turpentine and then applying the mixture to the wood by brushing or spraying. You can also apply a solution containing water and dye directly to the wooden surface. You can mix stains into varnishes or paints to make them part of your finish coat.
Preparing the surface for staining wood is the first step. Clean the wood to get rid of any grease, dirt or other substances that might be detrimental to the stain's application. Sanding smoothens scratches and rough spots. You must then decide on the type of stain that you wish to use. Penetrating stains are different from non-penetrating. Penetrating stain penetrates deeper into wood than nonpenetrating, making them suitable for dark colors like mahogany. Non-penetrating stains work best with light colors like maple.
After choosing the type and application method you prefer, gather your tools. A paintbrush works well for applying stains because it allows you to spread the liquid evenly across the surface. A few rags are also handy to clean up any spillages after you have finished painting. If you plan to mix the stain yourself, make sure you have enough containers available to hold the different components of the mixture.
After you have prepared your materials for staining, clean the area. Clean the area with soap and warm water to get rid of dirt and grime. Use a dampened rag and clean water to wipe the furniture. You should remove any debris, especially if your plan is to stain darker wood.
Apply the stain next. Apply the stain by brushing or spraying it onto one side of the furniture. You should work slowly and carefully. Continue moving along the grain until you reach your opposite end. You must be careful not to allow the stain to drip off the wood's edges. Before moving on to the next steps, allow the stain drying completely.
To protect the painted surface, apply a coat of clear polyurethane sealant. Apply three coats with polyurethane. Allow the third coat to dry overnight before sanding the final coat.