You can start by learning the basics of whittling if you're just starting out. You will need a knife and wood. This article will teach you about wood types, tools, and techniques. Once you have the basics, you can begin your own whittling projects. There are many types to choose from when it comes to whittler projects.
Wood
Although there are many wood types, this list will help you pick the right wood for your whittling needs. If you are just starting to whittle, the woods on this list will help you get the hang of the craft. There are many methods to whittle wooden pieces to make different shapes. Listed below are a few simple techniques for whittling wood.
The pull stroke is when you carve wood. Keep the blade parallel with the grain. This will ensure that the wood is not ripped. To tell the direction of the grain of wood, look for dark streaks running through the wood. These streaks will indicate the direction of your blade when you are whittling wood. The push stroke cuts through wood faster than the pull stroke.
Knife
Woodworking is something you can try if you are new. A good place to start is to whittle with a knife. Even though you may not be an expert, mastering the technique will allow you to control the knife better and make precise cuts. For example, you can practice the pull stroke by cutting small strips of soap with a knife. Practice makes perfect. Beginner projects are easier to handle and get more challenging as you progress.

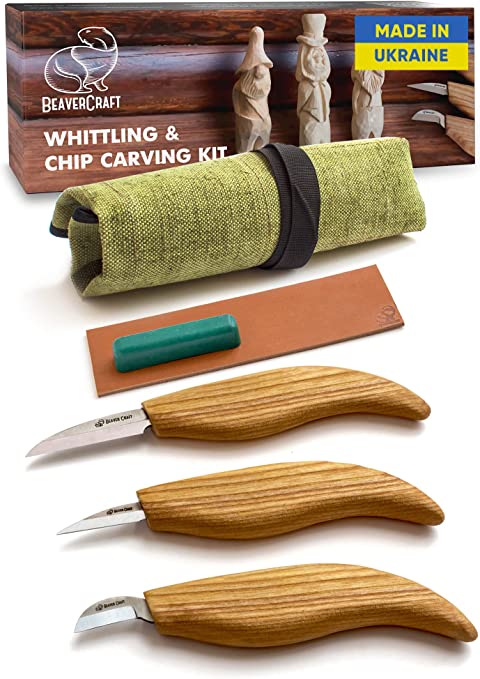
Before you begin whittling, a knife is essential. A pocket knife works well because it's sharp enough for shavings. Avoid knives that have long, sharp blades. They can cause choking and should not be used for this purpose. Instead, pick a knife with a narrow bevel, which will make it easier to hone. You can also use the frame saw, if you have one.
Techniques
These techniques can help you improve your skills in whittling. The pull stroke is the most common. It involves bracing the right thumb against the wood and pinching the right fingers. Then you will draw the knife towards your right thumb while maintaining the knife straight. This stroke is fast and controlled and allows you to have a lot more control over the blade. This technique is ideal for cutting intricate pieces.
There are 2 types of whittling guides. The Old Time Whittling book is the best reference book for complete beginners. The Little Book of Whittling also has many great ideas for whittling. The Whittling Handbook contains many whittling-related projects. The Art of Whittling contains some more advanced projects. This book has simple puzzles as well as patterns such as ball-and-cage.
Tools
Finding the right wood for your projects is the first step to making whittling instruments. While you can use wood from the street, it is better to have your own greenwood. Greenwood is more difficult to carve than dry wood. Also, deadfall branches are also available at any season. Small trees can be collected at any time of year, but they're best when you cut them in the winter. Before you collect wood from private property, make sure to ask permission.
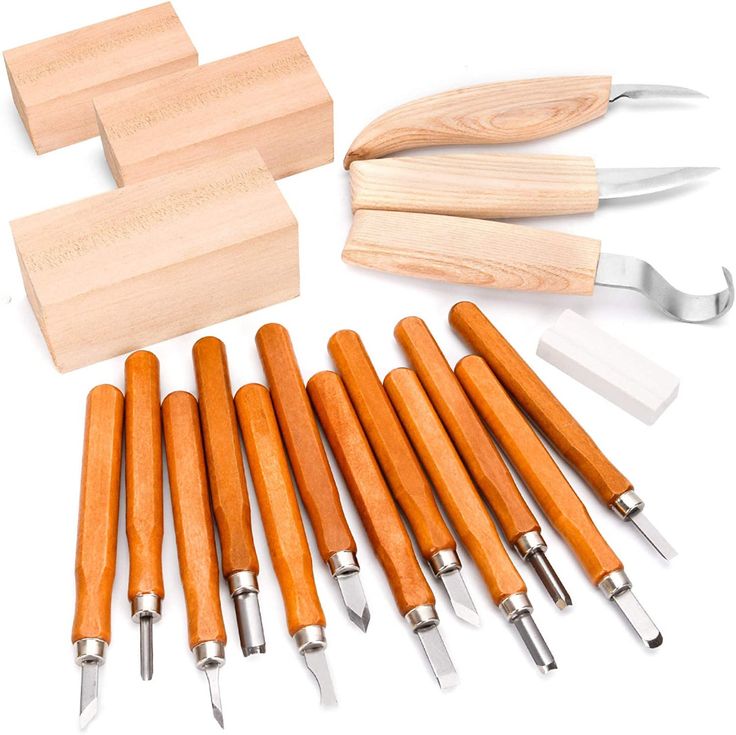
Sets are great for those just beginning to carve. The Delicacy carving set includes 12 tools, a blank wooden spoon and a sharpener. Protective gloves and a carrying case are included with the set. It's worth buying a set of whittling tools, since you'll be using them for a long time. This set can also be used to start.
Projects for beginners
If you are new at wood whittling, it is worth starting with something simple, such as a walkingstick. You can work your way up to more complex projects, like carving faces on walking sticks. Beginner whittlers may find comfort in a bird like the Comfort Birdie. Another beginner whittling idea is the swan. These are great gifts and easy to make for children.
A carved-ball in a frame is another great beginner project. You can make intricate designs or match feathers with your theme. You can also create Tiki idols and woodland spirits. There are many options, but it is always a good idea have a template to help you get started. You'll be able to identify which tools are best and what parts you don't need.
FAQ
What is the difference between plywood and particle board?
Plywood is made of layers of wood that are pressed together under pressure. Plywood can be cut to different thicknesses. It's commonly used as flooring and cabinets. Particle board is made from sawdust mixed with resin and then compressed into large blocks. It's commonly used for home improvement projects. Both boards are strong and can be easily cut.
What wood items do well?
The most successful wooden items are made from sustainable wood.
Maple, cherry, mahogany walnut, teak, mahogany and maple are the most common woods for furniture.
These woods not only have great strength, but also beautiful patterns and colors. They will last for many years, if taken care of properly.
To prevent moisture damage to wood furniture, it is important that it be painted before any other surfaces. This includes all surfaces, including drawers, doors, and handles.
You want your furniture to last as long as possible so you need to choose a paint that is water resistant.
Followed by two coats, you should apply a quality oil-based primer. Depending on the amount of wear, you may need several coats.
Spray cans and aerosol spray paints are not recommended. These products have solvents that evaporate quickly, leaving behind dangerous fumes.
What's the time taken to finish a piece furniture?
It depends on what size piece of furniture you have. For smaller projects such as picture frames and boxes, it can take less than a day to complete. Larger projects, like desks or dining tables require several days. It takes time for the wood to be stained and sealed properly.
How often should I get new supplies?
You'll probably have to replace some of your tools over time. If you are using hand tools, you will need to sharpen them frequently. And if you're using power tools, you'll need replacement parts periodically. To avoid buying too much at once, try to spread your purchases out over a few months.
How much will it cost to get started?
Because each project is unique there are no exact numbers. Here are some factors to help you estimate how much money you will need.
-
Materials cost
-
Tools and equipment
-
Time spent working on the project
-
Your hourly rate
-
How much profit do you expect to earn
-
No matter if you are looking to hire someone
Start small, if possible. You can make simple boxes or picture frames if you're just getting started. You will gain more experience and be able to tackle larger projects.
Statistics
- The best-paid 10 percent make $76,000, while the lowest-paid 10 percent make $34,000. (zippia.com)
- The U.S. Bureau of Labor Statistics (BLS) estimates that the number of jobs for woodworkers will decline by 4% between 2019 and 2029. (indeed.com)
- Overall employment of woodworkers is projected to grow 8 percent from 2020 to 2030, about as fast as the average for all occupations. (bls.gov)
- If your lumber isn't as dry as you would like when you purchase it (over 22% in Glen Huey's opinion…probably over 10-15% in my opinion), then it's a good idea to let it acclimate to your workshop for a couple of weeks. (woodandshop.com)
External Links
How To
How to drive a nail through wood
The first step in driving a nail into wood is to choose the correct size and type of hammer. Claw hammers include mallets, claw hammers (sledgehammers), mallets, ball-peen hammers, hatchets, and mallets. Each type has its strengths and weaknesses. A claw hammer, for example, is the best choice if you need to hit nails hard. However, it's not easy to know exactly where the impact will land. A sledgehammer is useful for striking large areas at once but too heavy to be effective for smaller tasks.
Once you have chosen the right hammer for you, put your hand flat against its side so that it rests comfortably in the palm of your hand. Hold the handle in your hand, but don’t force it too hard that you break. Your wrist should be relaxed while you hold the hammer straight upwards. You should then swing the hammer straight up, keeping your wrist relaxed. You should feel the impact from the hammer striking a nail. You can practice swinging the hammer with a block or wood until you feel the rhythm.
You can now drive the nail by holding the hammer to your body. The nail should be perpendicular to wood's surface. Keep your eyes on the tip. Move the hammer forward and then continue to move the hammerhead. Repeat this action several times, gradually increasing the speed of the swing. Try adding power to your swings when you've mastered the technique. Then, raise the hammer from your shoulder to bring it down. This will help you put more energy behind each of your moves.
Once you have successfully drilled the first hole in the nail, remove the hammer. The rest of the nails can be pulled out using a screwdriver, pry bar, or a hammer. To prevent splitting the wood, ensure you keep the nail heads flush against the board's surface.