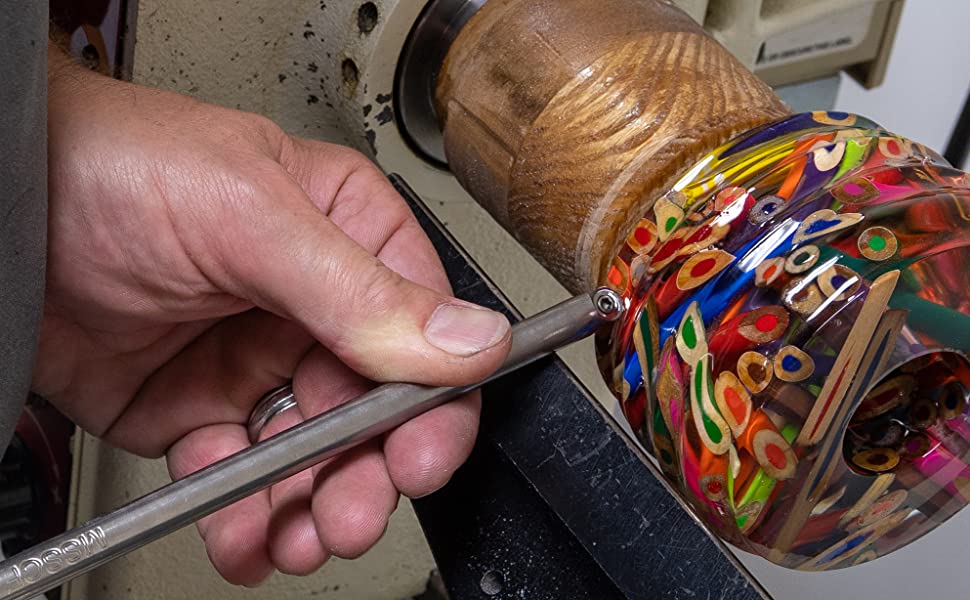
A bowl-gouge is a tool to shape or smoothen out the surface a bowl. Its shape and size determine what kind of work you are able to do with it. An instruction leaflet is included with the gouge. It comes with a forge tip that can be used to make rough cuts in the interior or outside of a bowl. The gouge is also made with a balance and edge for fine projects. It is made out of high-quality, steel.
Shape
A bowl grinder is a tool that can shape bowls. It is usually made of wood, and can be quite costly. For just a few hundred dollars, you can get a gouge at the local home-center. This wood is very forgiving. It requires several exterior cuts as well as a hollowing cut. A basic 2x6 piece may be a good starting point for bowl making. It is a great choice for beginners because it is affordable and easy to work with.
There are many styles of bowl gouges available. The standard bowl gouge is 5/8 in diameter. The 3/4-inch gouge is slightly larger. Although bigger tools are generally more efficient they do not necessarily make a better tool. You should experiment with different sizes and gouges until you find the right one for you. Each turner will have a preferred grind. This is why you should play around with different tools until your favorite one.
Size
To size bowl gouges, there are two main systems. English and North American systems measure gouges according to their rod diameter and flute width. A 1/2" gouge is marked in one system, while the other system uses 5/8” and 1” diameters. This difference in measurements can make the gouge more accurate and help you choose the right size to fit your lathe. First, determine the bowl's diameter to choose the right bowl gouge. Then choose the right size according to the bowl's size or the flute of the gouge.
Although there are many benefits to using larger bowl gouges, they tend be heavier and bulkier. Beginners should start with a smaller bowl gouge and gradually increase in size. However, for more experienced woodworkers, you should never limit yourself to a single size. If you have mastered your woodworking skills you can purchase larger bowl gouges. Although they are harder than stainless steel, carbon steel bowl gouges require more maintenance than their stainless counterparts.
Function

A bowl gouge serves two main purposes. It prepares the bowl's outside surface for sanding. The left wing of the gouge pivots on its tool rest. The cutting edge comes in contact with the wood once the handle has been raised. The cut then moves away from the wood, revealing a smooth, ready-to-sand surface. A bowl gouge is secondarily equipped with a single cutting edge, the bevel.
The bevel angle for a bowl gouge's bowl can range from 40 to 45 degrees. This can vary depending upon the circumstances. Large bevel angles work best when turning large bowls. You can also use smaller angles to cut beads and spindles. Choosing the right angle depends on what you are going to use the tool for, as a large bevel angle can be difficult to achieve without damaging the wood.
Handle
Keep the bowl gouge handles against your body when you cut bowls. This will help to maintain the bowl's curve. To create a convex shape in the bowl, swing the handle while keeping the tool rest steady with your left hand. Adjust the tool rest height to allow you to work at desired depths and widths. A sharp gouge should be able to cut up to an inch or two into the bowl at a time, depending on the size of the bowl you are working with.
A bowl gouge has a bowl-shaped shaft made from a rod of steel that is then machined into the desired shape. It is usually shaped like a bowl and has a flute-like concave area. This area is hollowed in during the milling process. There are a few bowl gouges with hardwood handles. But, you can also get other materials. Some bowl gouges have a massive handle to make cutting a large area easier.
FAQ
Do I need to be a genius to succeed in woodworking?
No. Woodworking does not require any special skills. You can create beautiful pieces of art by learning how to use simple power tools.
What tools do I need to start as a woodworker and what should I learn?
Woodworking takes practice and patience. It takes time to learn how to use all the different tools and techniques required for woodworking.
There are many options for woodworking equipment today. Some prefer to use power tools and others prefer hand tools.
It's your choice. But you should ensure that you pick the right tool. If you don't have any experience, you may consider starting with a basic set of hand tools.
You might also want to learn how a router works, which allows you to cut wood into intricate shapes. These can be found at most hardware shops.
What would be your first step in woodworking?
Start with softwoods such as pine and poplar. You will feel more comfortable with these softwoods, so you can move onto hardwood.
What are the basics of woodworking?
It is an excellent way to learn how to build furniture. You can make a simple bench yourself. You can use any wood you have in your home to complete this project. If you aren't sure what type of wood to use, you can buy cheap pine boards from Lowes or Home Depot. After you've built your bench, you'll want to sand off all the rough edges and finish it with a stain or varnish.
Is it possible to learn woodworking by yourself?
The best way to learn anything is by doing. Woodworking is an art form that requires patience, practice, skill, and experience. Any craft requires patience to master.
The best way to learn how to do something is actually to do it. Start small and use what you learn.
How long does it usually take to complete a piece furniture?
It depends on the wood type you choose, the complexity and the amount you apply to the finished product. Hardwoods, for example, require more maintenance than softwoods. Hardwoods also tend to be more expensive than softwoods. They last longer and are more resistant to moisture. Finishing furniture can take anywhere from one week up to three months.
Statistics
- Overall employment of woodworkers is projected to grow 8 percent from 2020 to 2030, about as fast as the average for all occupations. (bls.gov)
- Average lumber prices rose about 600 percent between April 2020 and May 2021. (familyhandyman.com)
- In 2014, there were just over 237,000 jobs for all woodworkers, with other wood product manufacturing employing 23 percent; wood kitchen cabinets and countertop manufacturing employing 21 percent. (theartcareerproject.com)
- If your lumber isn't as dry as you would like when you purchase it (over 22% in Glen Huey's opinion…probably over 10-15% in my opinion), then it's a good idea to let it acclimate to your workshop for a couple of weeks. (woodandshop.com)
External Links
How To
How to drive a nail through wood
It is essential to pick the right size and style of hammer before you can drive a nail in wood. The most commonly used types of Hammers are claw hammers. Each type of hammer comes with its advantages and disadvantages. A claw hammer works well when you're trying to hit nails with a heavy hammer. However it is difficult to precisely control where the blow hits. A sledgehammer allows you to hit large areas simultaneously, but it is too heavy and cumbersome to use for small tasks.
After selecting the right hammer, you will need to place your hand flat against one side of the head. The handle should rest comfortably in your hands. You can grip the handle with your fingers, but not so tight that it causes injury. Keep your wrist relaxed and the hammer straight up. Next, swing the hammer toward the ground and aim for the nail's center. You should feel the impact from the hammer striking a nail. Try practicing with a block to help you master the art of swinging a stick.
Once you are ready to drive the nail, place the hammer close to your body. The nail should be perpendicular to wood's surface. Keep your attention on the tip. Swing the hammer forward, then follow through with the motion of the hammerhead. Continue this motion several times, slowly increasing the speed of each swing. Once you've mastered the technique, try adding power to your swings. Try holding the hammer above your shoulder and bring it down forcefully. This will help you put more energy behind each of your moves.
Once you have made the first hole, remove your hammer. Use a pry bar or screwdriver to pull out the rest of the nails. You should ensure that the nails are flush with the board's surface to avoid splitting the wood.